I don’t remember planting this

Hey everybody, happy middle of July! Can you believe it?! It’s gonna be Christmas before we know it, lol! I’m up on the CutCardStock blog today with a tutorial for making a super cute flamingo-themed friendship card! This would be a fun one to send to someone whose birthday was inadvertently overlooked, says ol’ forgetful me! LOL! I used a nice variety of cardstock and I love the summery color palette!
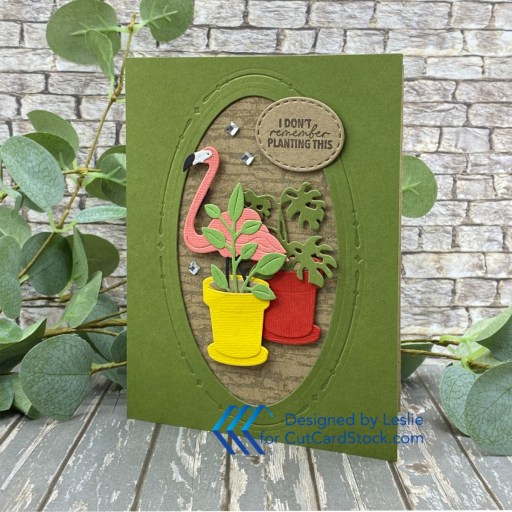
I cut the card base from Glama Brown Kraft and used the Stampin’ Up! Stacked Stone background stamp (stamped in Ranger Frayed Burlap distress oxide ink) on the front flap. I cut a panel from Pop Tone Jellybean Green and cut an embossed oval aperture using the Sizzix Fanciful Framelits Reversed-Clare Classic Ovals dies. I used the Spellbinders Plant It Here dies along with Flamingo, Lessebo Pitch Black, 80# Solar White, Habanero Red, Rubber Ducky Yellow, Pop Tone Jellybean Green and Pop Tone Gumdrop Green to create the focal images which I popped up on Scrapbook Adhesives Thin 3D Foam Squares and 3D Foam Squares.

I stamped a sentiment from the Spellbinders Around The Garden stamp set in Catherine Pooler Icing on the Cake ink and cut it with a Love From Lizi Stitched Oval Nested Cutting Die. The finishing touch was adding some Darice rhinestone squares for a little bling.

I cut the inside panel from Classic Crest Recycled 100% Classic Natural White (my new favorite off-white cardstock) and embellished it with a couple leftover strips of the green cardstock used on the front. I stamped another sentiment from the Spellbinders stamp set in the brown ink.

Sharing in the following challenges:
1. https://avenue613.blogspot.com/2026/07/july-2026-anything-goes-w-optional.html
2. https://lovetoscrapchallengeblog.blogspot.com/2026/07/ltscb-180-anything-goes-ltscb-179.html
3. https://tuesdaytaggers.blogspot.com/2026/07/animals-realimaginary.html

Affiliate links are used in this post at no cost to you – I really appreciate your support!

CutCardStock products used:
Glama Brown Kraft
Flamingo
Lessebo Pitch Black
Classic Crest 80# Solar White
Habanero Red
Rubber Ducky Yellow
Pop Tone Jellybean Green
Pop Tone Gumdrop Green
Classic Crest Recycled 100% Classic Natural White

Other products used:
STAMPS: Stampin’ Up! Stacked Stone background stamp, Spellbinders Around The Garden stamp set
INK: Ranger Frayed Burlap Distress Oxide ink, Catherine Pooler Icing on the Cake
DIES/PUNCHES: Sizzix Fanciful Framelits Reversed-Clare Classic Ovals, Spellbinders Plant It Here dies, Love From Lizi Stitched Oval Nested Cutting Dies
ACCESSORIES: Fiskars 12″ ProCision Rotary Bypass Paper Trimmer, Spellbinders 12×12 Scoring Board, TapeRunner Retractable Double-Sided Adhesive Tape, My Sweet Petunia Precision Glue Press, Bearly Art Precision Craft Glue, Mini MISTI, Big Shot, Scrapbook Adhesives Thin 3D Foam Squares Black Mix and 3D Foam Squares Regular Black, Darice Rhinestone Squares

I hope you’ve enjoyed today’s project and you’re inspired to get crafty! Be sure to check out all the awesome cardstock and other goodies at CutCardStock (adhesives, labels, stickers, pens, watercolors and ribbon to name a few). And head on over to the CutCardStock Pinterest Page and CutCardStock Facebook Page and for more inspiration! Also, be sure to join our Creating with CutCardStock Facebook Group for even more crafty inspiration! Thanks so much for stopping by today – we’ll see you next time!

Scrappy hugs,

Party Treat Bags

Hi friends – Happy Hump Day! I’m up on the Scrapbook Adhesives By 3L blog today sharing a tutorial for making a set of party treat bags. You’ll remember me mentioning in my post a couple weeks ago that we were assigned a ‘special project’ (a three-piece ensemble for the Scrapbook Adhesives by 3L Trade Show Booth) and this set of birthday party treat bags is Part 2. You’ve seen the chocolate bar, so now I bring you the treat bags… every birthday party needs a cute little bag to hold the treats and favors, right?!

I used cardstock from CutCardStock, the Goodie Bag die from Lawn Fawn, papers and die cut pieces from the Keep It Simple Happy Birthday collection, and quite a few awesome products from Scrapbook Adhesives. All three pieces of my ensemble show off the ‘Wear Your Adhesive on the Outside’ technique which I have fallen in love with, and if you haven’t tried it yet, you really need to! These were so fun to make!

I used the super cute Goodie Bag die from Lawn Fawn. The bags feature CutCardStock Pop Tone Grape Jelly and Basis Light Lime cardstock, in addition to CutCardStock Lessebo Sunflower Yellow, Lessebo Splash, Pop Tone Wild Cherry and more Pop Tone Grape Jelly for the rosettes. Used Coco & Reno Mini Tag Flip Cutting Dies and EK Success 3/4″ Circle Punch to make the rosettes.

Of course, as mentioned above, I employed the ‘Wear Your Adhesive on the Outside’ technique for the circles in the center of the rosettes. Also used Keep It Simple Happy Birthday 12×12 Collection Pack and Die Cut Pieces. I typed the verbiage for the name tags on my laptop and printed them on Neenah Classic Crest 80# Solar White cardstock prior to cutting them with the ticket die in the Coco & Reno Mini Tag Flip Cutting Dies.

And here is the green one. For demonstration purposes, I only made two, but you could make as many of these as you’d like. They are THAT fun! Be sure to see my tutorial on the Scrapbook Adhesives blog to see how I made them!

Sharing in the following challenges:
1. https://avenue613.blogspot.com/2026/07/july-2026-anything-goes-w-optional.html
2. https://alphabetchallengeblog.blogspot.com/2026/07/f-is-for-festivities-eg-wedding-birthay.html

Products used:
Scrapbook Adhesives by 3L®
Crafty Power Tape Polybag 81ft.
E-Z Runner® Grand Permanent Strips Refillable Dispenser
3D Foam Circles White Mix
Metallic Transfer Foil Sheets Celebrate Colors
Thin 3D Foam Squares White Mix
3D Foam Squares Micro White
Adhesive Lines
Adhesive Dots Micro

HomeHobby™ by 3L
Dual Tip Glue Pen

Affiliate links are used in this post at no cost to you – I really appreciate your support!

Other products used:
CARDSTOCK/PAPER: CutCardStock Basis Light Lime (no longer in stock), Pop Tone Grape Jelly, Lessebo Sunflower Yellow, Lessebo Splash Blue, and Pop Tone Wild Cherry cardstock; Neenah Classic Crest 80# Solar White cardstock, Keep It Simple Happy Birthday 12×12 Collection Pack and Die Cut Pieces
DIES/PUNCHES: Lawn Fawn Goodie Bag Die, Coco & Reno Mini Tag Flip Cutting Dies, EK Success 3/4″ Circle Punch
ACCESSORIES: Fiskars 12″ ProCision Rotary Bypass Paper Trimmer, Big Shot, toothpicks, Making Memories Purple and Blue Glitter

I hope you’ve enjoyed this project and you’re inspired to get your crafty supplies out and play! Be sure to check out the awesome array of adhesives and other craft supplies Scrapbook Adhesives By 3L has to offer! And be sure to follow us on FacebookPinterestInstagram and Twitter for lots of crafty inspiration! And if you haven’t yet subscribed to our YouTube Channel, be sure to do that, too, for even more inspiration! Thanks so much for stopping by today – we’ll see you next time! 

Scrappy hugs,

You’re In My Thoughts

Hey everybody, happy middle of the week and middle of July! The weeks and months are just flying by at a high rate of speed, aren’t they?! One of my projects was a top pick last month over at The Creative Crafters and I was invited to guest design for an upcoming challenge, so here I am! I’m delighted to share my inspiration project for Challenge #102 – a masculine get well card I made for our pastor who had surgery. I used the Stampin’ Up Hats Off stamps and dies along with the older Stampin’ Up! A Dozen Thoughts stamp set. I really like how this turned out – the hat looks like it’s suede!

I cut the card base from CutCardStock Glama Kraft cardstock along with layering panels and strips from prints in the Crafter’s Companion Just For Men Urban Collection 6×6 paper pad. I used the Tonic Corner Punch to angle the lower right corner. Using the Stampin’ Up! Hats Off stamps and dies, I created the hat which I love! I heat embossed a sentiment from the Stampin’ Up! A Dozen Thoughts stamp set and popped the hat up on foam squares for a little dimension. The finishing touch on the front was adding a few Keep It Simple Back To Basics Kraft Enamel Dots.

I cut the inside panel and strips from the Glama Kraft and created kind of an inlaid strip using a leftover piece of paper from the Crafter’s Companion Just For Men Urban Collection. I stamped another sentiment from the Stampin’ Up! A Dozen Thoughts stamp set and layered the panel on another print from the Urban collection.

Sharing in the following challenges:
1. https://avenue613.blogspot.com/2026/07/july-2026-anything-goes-w-optional.html
2. https://cardsgalorechallenges.blogspot.com/2026/07/july-2026-crafts-galore-encore.html
3. https://lovetocraftchallengeblog.blogspot.com/2026/07/ltccb-93-and-ltccb-92-winner-and-top.html
4. https://mixitupchallenge.blogspot.com/2026/07/miucb-84-anything-goes-optional-shape.html

Affiliate links are used in this post at no cost to you – I really appreciate your support! 

Products used:
CARDSTOCK/PAPER: CutCardStock Glama Kraft cardstock, Crafter’s Companion Just For Men Urban Collection 6×6 paper pad
STAMPS: Stampin’ Up! Hats Off and A Dozen Thoughts stamp sets
INK: Versafine Onyx Black ink, Brutus Monroe clear embossing ink
DIES/PUNCHES: Tonic Corner Punch, Stampin’ Up Hats Off die set
ACCESSORIES: Fiskars 12″ ProCision Rotary Bypass Paper Trimmer, Spellbinders 12×12 Scoring Board, TapeRunner Retractable Double-Sided Adhesive Tape, My Sweet Petunia Precision Glue Press, Bearly Art Precision Craft Glue, Mini MISTI, Big Shot, Brutus Monroe Raven embossing powder, Keep It Simple Back To Basics Kraft Enamel Dots, Scrapbook Adhesives 3D Foam Squares (white mix)

I hope you’ve enjoyed seeing this project and will link up with us this time! Thanks so much for stopping by today – we’ll see you next time! ;)

Scrappy hugs,

Princess In Training

Hey everybody, happy Tuesday – can you believe it’s the middle of July already?! Dang, time just doesn’t stand still for anybody! I’m delighted to share another Keep It Simple DT inspiration project with you today. This extended z-fold (inspiration from Connie Stewart–see her blog for a tutorial) features papers and die cut pieces from our new Once Upon A Time: Rapunzel collection! If you are a princess fan and haven’t seen this collection yet, you are in for a real treat! And this fun fold really shows off these products!

I cut the card base from CutCardStock Lessebo Amethyst cardstock along with layering panels from coordinating prints in the Rapunzel 12×12 Collection Pack and Classic Crest 80# Solar White cardstock. I embellished the front with Rapunzel Die Cut Pieces, popping some of them up on Back To Basics Adhesive Squares. I used Back To Basics Pastel Gingham Ribbon for the closure.

I used more of the Rapunzel Die Cut Pieces to embellish the inside panels. This was a surprisingly easy card that worked up pretty quickly. Be sure to check out Connie’s video – she’s such a hoot!

Sharing in the following challenges:
1. https://avenue613.blogspot.com/2026/07/july-2026-anything-goes-w-optional.html
2. http://cardz4galz.blogspot.com/2026/07/280-for-friend-or-friendship.html
3. https://secretstamper.com/creative-creases-117-july-3-through-august-6/
4. https://letscreatechallenges.blogspot.com/2026/07/challenge-233-ag-fun-in-sun.html

Keep It Simple products used:
Once Upon A Time: Rapunzel 12×12 Collection Pack
Once Upon A Time: Rapunzel Die Cut Pieces
Back To Basics Adhesive Basics Foam Adhesive Squares & Strips
Back To Basics Pastel Gingham Ribbon
Bearly Art Precision Craft Glue

Affiliate links are used in this post at no cost to you – I really appreciate your support!

Other products used:
CARDSTOCK/PAPER: CutCardStock Lessebo Amethyst cardstock, Classic Crest 80# Solar White cardstock
DIES/PUNCHES: Kadomaru Pro Corner Rounder
ACCESSORIES: Fiskars 12″ ProCision Rotary Bypass Paper Trimmer, Spellbinders 12×12 Scoring Board, TapeRunner Retractable Double-Sided Adhesive Tape, My Sweet Petunia Precision Glue Press

I hope you’ve loved seeing this project as much as I loved creating it and you’re inspired to get crafty! Be sure to check out ALL the fun goodies in the Keep It Simple online store! Save 10% on your entire order when you shop online using code LoveToScrap2 at checkout! There is no minimum purchase requirement and no usage limits, AND it combines with product, order, and shipping discounts! Is that cool, or what?! Be sure to Follow us on Facebook, Instagram, and Pinterest for lots of crafty inspiration! Thanks so much for stopping by today – we’ll see you next time!

Scrappy hugs,

Celebrating America

Howdy, peeps – I hope your week has started off nicely! I have one last Independence day project for ScrapbookingStore to share that I created with items in the July 2026 Scrapbook Kit! Our nation’s 250th birthday celebration just wouldn’t be complete without a shaker card with red, white and blue star sequins, right?! I created a full-face shaker using leftover cellophane packaging which is so much easier to work with and lays flatter than traditional acetate. This shaker card features a trimmed journaling card, a paper strip, and stickers from this month’s kit, all adhered to a 4″ x 6″ flat card base.

I cut a 4” x 6” postcard size flat card base from Classic Crest 110# Solar White cardstock. I formed a shaker pocket with leftover packaging cellophane adhered to the back-side edges of a trimmed journaling card from the kit. I added the red, white and blue star sequins (from the Keep It Simple Back To Basics Sprinkles line), sealed the pocket, and adhered the shaker to the postcard base. I added a sentiment sticker from the sticker sheet which completed the shaker front. 

For the back, I added a paper strip to the bottom along with a few more stickers (banner, stars and a sentiment) from the sticker sheet. What a delightful shaker card… the grand finale of projects made with this amazing kit! ;)

Sharing in the following challenges:
1. https://hereisaplacetostart.blogspot.com/2026/07/challenge-202607-anything-goes-wopt.html
2. https://wordartwednesday.blogspot.com/2026/07/anything-goes-weeks-760-761.html

Affiliate links are used in this post at no cost to you – I really appreciate your support!

ScrapbookingStore products:
July 2026 Scrapbook Kit – Simple Stories simple Vintage Land of the Free 12×12 Collection Kit (paper/journaling card and stickers)

Other products used:
CARDSTOCK/PAPER: Classic Crest 110# Solar White cardstock
ACCESSORIES: Stampin’ Up! Paper Trimmer, My Sweet Petunia Precision Glue Press, Bearly Art Precision Craft Glue, clear cellophane packaging, Scrapbook Adhesives Crafty Power Tape 81 ft, Keep It Simple Sequins RWB Stars

I hope you’ve enjoyed today’s project and you’re thinking about all the fun you could have with this month’s kit… you really ought to think about joining the Subscription Club! Be sure to Follow us on Facebook, Instagram, Pinterest and YouTube for lots of crafty inspiration! And if you do decide to join the Subscription Club, join our ScrapbookingStore Club Member Group on Facebook for more inspiration and to share your projects! Thanks so much for stopping by today – we’ll see you next time!

Scrappy hugs,

the good life

Hi friends – happy Monday! I hope you had a wonderful weekend! I have another fun fold for ScrapbookingStore to share with you today that I created with paper and stickers from the July 2026 Scrapbook Kit! I have definitely been in a patriotic state of mind and have had THE best time playing with this collection! My inspiration for this book fold with pocket came from Connie Stewart. Be sure to see her blog for a video called Book Binding Pocket Cards. The classic book fold has been around forever and this version has a little pocket on the inside with a pull-out card. I reversed the orientation so it opens left to right and the pull-out card is nested on the left-hand side, which you’ll see below.

I cut the card base from the cherries/diagonal striped patterned paper in the kit. I cut the focal panel from CutCardStock Pop Tone Wild Cherry and Wedding Cake cardstock and layered the pieces together. I then adhered the focal panel to the right-hand flap and embellished it with image, sentiment and star stickers from the sticker sheet.

Moving to the left side of the card, I punched a thumb notch into the edge of the pocket with a Stampin’ Up! 1-3/4″ Circle Punch, adhered the edges, and added a small gingham bow. I cut the pull-out card from the Wedding Cake cardstock and embellished it with a few more stickers from the sticker sheet. Such an easy card design without a heavy cardstock base! The focal panel just needs to be cut from lighter weight cardstock that corresponds to the weight of the patterned paper.

Sharing in the following challenges:
1. https://hereisaplacetostart.blogspot.com/2026/07/challenge-202607-anything-goes-wopt.html
2. https://cupcakeinspirations.blogspot.com/2026/07/639-july-cupcake-inspiration-challenge.html

Affiliate links are used in this post at no cost to you – I really appreciate your support!

ScrapbookingStore products:
July 2026 Scrapbook Kit – Simple Stories simple Vintage Land of the Free 12×12 Collection Kit (paper and stickers)

Other products used:
CARDSTOCK/PAPER: CutCardStock Pop Tone Wild Cherry and Wedding Cake cardstock
DIES/PUNCHES: Stampin’ Up! 1-3/4″ Circle Punch
ACCESSORIES: Stampin’ Up! Paper Trimmer, My Sweet Petunia Precision Glue Press, Bearly Art Precision Craft Glue, Keep It Simple Back to Basics Stars & Stripes Ribbon Pack

I hope you’ve enjoyed today’s project and you’re thinking about all the fun you could have with this month’s kit… you really ought to think about joining the Subscription Club! Be sure to Follow us on Facebook, Instagram, Pinterest and YouTube for lots of crafty inspiration! And if you do decide to join the Subscription Club, join our ScrapbookingStore Club Member Group on Facebook for more inspiration and to share your projects! Thanks so much for stopping by today – we’ll see you next time!

Scrappy hugs,

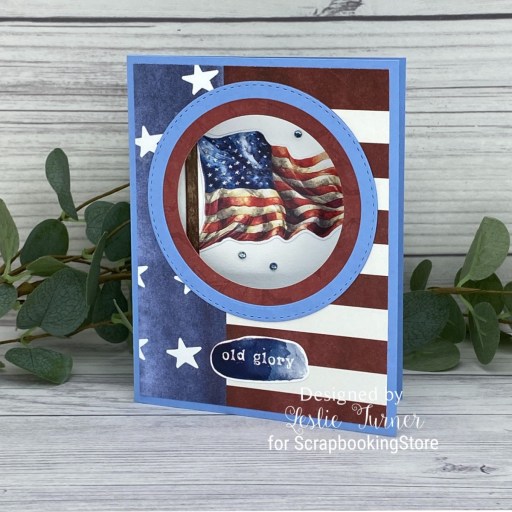
old glory

Hey everybody – I hope you’re having a great weekend! I have another fun ScrapbookingStore DT inspiration project to share with you today created with papers and stickers in the July 2026 Scrapbook Kit! As I mentioned in my previous post, I’ve had a great time playing with this collection – our 250th birthday is such a milestone for the USA! This classic tri-fold with a view card design is such a fun one and I thought it would be perfect to showcase our flag.

I cut the card base from medium blue cardstock, along with a layering panel for the card front. I cut a round aperture into the front flap using a Keep It Simple Back to Basics Nested Stitched Circles Die. I added two frames (cut with the same die set) and a sentiment sticker, which completed the front of the card.

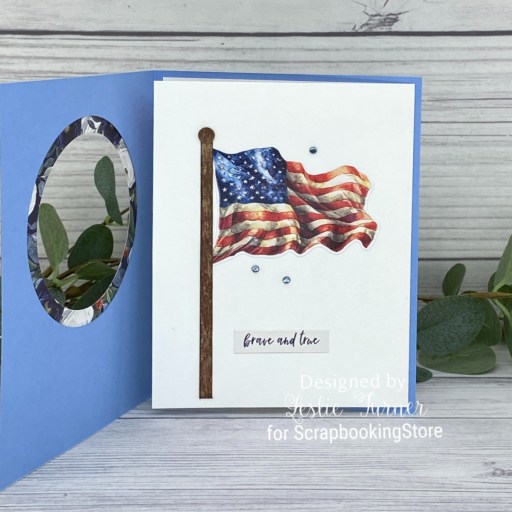
I cut the inside flap from white cardstock and put the fold on the right, which created the simple tri-fold design. I added the flag sticker from the sticker sheet along with a hand-cut flag pole that I inked with Memento Rich Cocoa Ink (DTP technique). To finish this flap, I added another sentiment sticker and a few light blue gemstones.

All that was left to do was add a border, one more sentiment and a few stars to the inside, all from the sticker sheet in the collection.

Sharing in the following challenges:
1. https://hereisaplacetostart.blogspot.com/2026/07/challenge-202607-anything-goes-wopt.html
2. https://letscreatechallenges.blogspot.com/2026/07/challenge-233-ag-fun-in-sun.html
3. https://lovetocraftchallengeblog.blogspot.com/2026/07/ltccb-93-and-ltccb-92-winner-and-top.html
4. https://lovetoscrapchallengeblog.blogspot.com/2026/07/ltscb-180-anything-goes-ltscb-179.html

Affiliate links are used in this post at no cost to you – I really appreciate your support!

ScrapbookingStore products:
July 2026 Scrapbook Kit – Simple Stories simple Vintage Land of the Free 12×12 Collection Kit (papers and stickers)

Other products used:
CARDSTOCK/PAPER: CutCardStock Basis Medium Blue and Basis White cardstock and Kraft chipboard, Classic Crest 80# Solar White cardstock
INK: Memento Rich Cocoa Ink (DTP technique to flag pole)
DIES/PUNCHES: Keep It Simple Back to Basics Nested Stitched Circles Dies, Stampin’ Up! 1/4″ Circle Punch (ball on top of flag pole)
ACCESSORIES: Stampin’ Up! Paper Trimmer, My Sweet Petunia Precision Glue Press, Bearly Art Precision Craft Glue, Big Shot, TPC Studio Winter Whites Jewels

I hope you’ve enjoyed today’s project and you’re thinking about all the fun you could have with this month’s kit… you really ought to think about joining the Subscription Club! Be sure to Follow us on Facebook, Instagram, Pinterest and YouTube for lots of crafty inspiration! And if you do decide to join the Subscription Club, join our ScrapbookingStore Club Member Group on Facebook for more inspiration and to share your projects! Thanks so much for stopping by today – we’ll see you next time!

Scrappy hugs,

Grateful

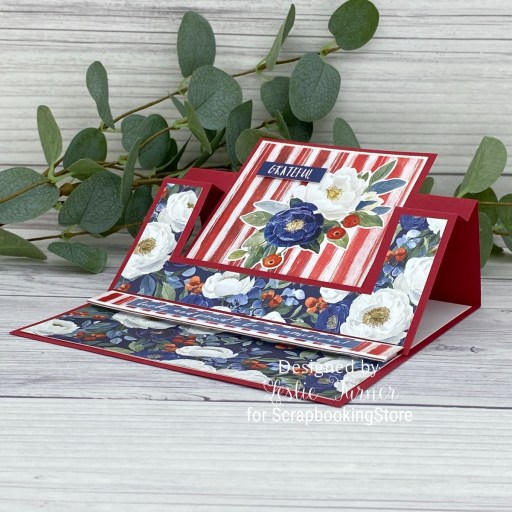
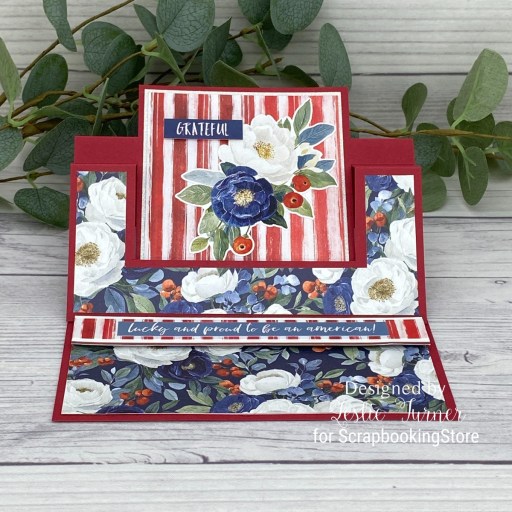
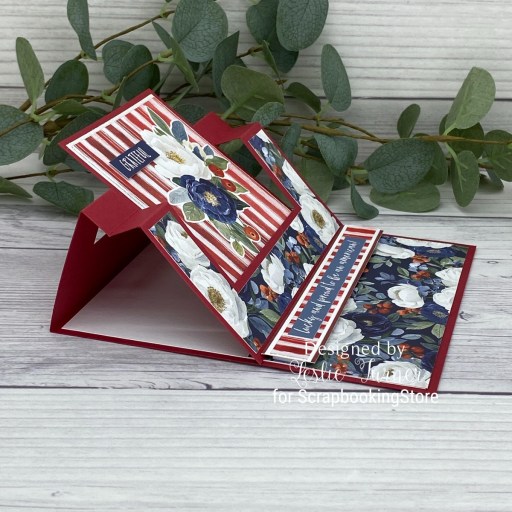
Hey everybody, happy Saturday! I hope you are not sweltering in this Summer heat! It’s pretty warm and humid here, so I’m doing the easy thing… staying indoors crafting! I have another fun ScrapbookingStore DT inspiration project to share with you today created with papers and stickers in the July 2026 Scrapbook Kit! I’ve had THE best time with the patriotic red, white and blue patterns in this collection! And this swing easel card design is one of my favorites because it puts a little different spin on the classic easel card. I’ve made a few of these over the years – my inspiration originally came (quite a while back) from the Splitcoast Stampers tutorial HERE.

I cut the easel card base from CutCardStock Lessebo Dawn Maroon cardstock along with layering panels from Stampin’ Up Dazzling Diamonds paper and two coordinating prints in the collection. I embellished the swing easel with sentiment and image stickers from the sticker sheet, and added another sentiment to a long narrow strip across the bottom (popped up on Scrapbook Adhesives Crafty Foam Tape) which serves as the easel stopper.

And here’s an additional side view to see the fun construction of this card. There is plenty of room to write a handwritten message on the white space inside, and it folds flat for mailing. I typically place the stopper about an inch closer to the fold line to make the focal panel stand up a little more. Not sure why I didn’t do that this time, but I still love how it turned out!

Sharing in the following challenges:
1. https://hereisaplacetostart.blogspot.com/2026/07/challenge-202607-anything-goes-wopt.html
2. https://cardsgalorechallenges.blogspot.com/2026/07/july-2026-crafts-galore-encore.html
3. https://secretstamper.com/creative-creases-117-july-3-through-august-6/

Affiliate links are used in this post at no cost to you – I really appreciate your support!

ScrapbookingStore products:
July 2026 Scrapbook Kit – Simple Stories simple Vintage Land of the Free 12×12 Collection Kit (papers and stickers)

Other products used:
CARDSTOCK/PAPER: CutCardStock Lessebo Dawn Maroon cardstock, Classic Crest 80# Solar White cardstock, Stampin’ Up! Dazzling Diamonds Glimmer Paper
ACCESSORIES: Stampin’ Up! Paper Trimmer, TapeRunner Dots Double-Sided Adhesive Tape, My Sweet Petunia Precision Glue Press, Bearly Art Precision Craft Glue, Scrapbook Adhesives Crafty Foam Tape 54 ft White

I hope you’ve enjoyed today’s project and you’re thinking about all the fun you could have with this month’s kit… you really ought to think about joining the Subscription Club! Be sure to Follow us on Facebook, Instagram, Pinterest and YouTube for lots of crafty inspiration! And if you do decide to join the Subscription Club, join our ScrapbookingStore Club Member Group on Facebook for more inspiration and to share your projects! Thanks so much for stopping by today – we’ll see you next time!

Scrappy hugs,

boom-pop-sparkle

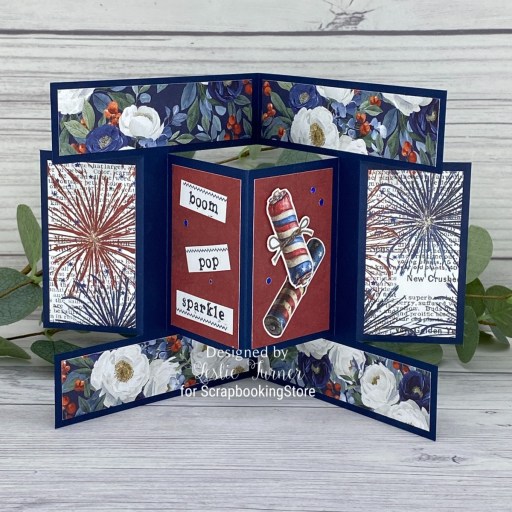
Hey everybody, happy Friday! I’m back with my second post of the morning which I hope you’ll love! I created this fun ScrapbookingStore DT inspiration project with papers, journaling card trimmings, and stickers in the July 2026 Scrapbook Kit! Even though July 4th is behind us, this kit is chock full of Independence Day red, white and blue, and I made five projects with it! After all, our nation only has one 250th birthday, right?!

I was inspired to try this burst fun fold after seeing Peri’s recent tutorial HERE over at the Papercrafting Threads blog. I kept thinking this fold looked very familiar, and sure enough, Connie Stewart showcased it nearly a year ago HERE and I just hadn’t gotten around to making it. There’s only one difference between these two versions (the direction of the fold lines) and I made Connie’s version this time. It’s definitely a fun one, and I’ve since made another one (using Peri’s version) for a friend recovering in the hospital which I’ll be sharing soon, so stay tuned!

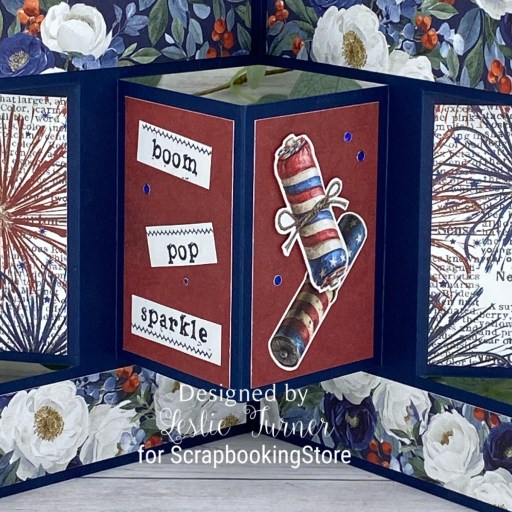
The card base is really quite simple with just a few cuts and scores that I created with Classic Crest Patriot Blue cardstock from CutCardStock. I cut layering panels from several prints in the collection, and used my Sakura Clear Star Gelly Roll pen to enhance the fireworks on the outer patterned paper panels. I added elements cut from journaling cards to embellish the front panels, popping one of the firecrackers up on Scrapbook Adhesives Thin 3D Foam Squares. The finishing touch was adding a few blue Stampendous Dot Sparklers.

I cut the back panels from Classic Crest 80# Solar White cardstock and embellished them with stickers from the sticker sheet. I do love that “Proud American” sentiment!

Sharing in the following challenges:
1. https://avenue613.blogspot.com/2026/07/july-2026-anything-goes-w-optional.html
2. https://alphabetchallengeblog.blogspot.com/2026/07/f-is-for-festivities-eg-wedding-birthay.html (4th of July/Independence Day in the States)
3. https://lovetocraftchallengeblog.blogspot.com/2026/07/ltccb-93-and-ltccb-92-winner-and-top.html
4. https://lovetoscrapchallengeblog.blogspot.com/2026/07/ltscb-180-anything-goes-ltscb-179.html
5. https://mixitupchallenge.blogspot.com/2026/07/miucb-84-anything-goes-optional-shape.html
6. https://cinspirations.blogspot.com/2026/07/july-challenge-summer-sunshine.html

Affiliate links are used in this post at no cost to you – I really appreciate your support!

ScrapbookingStore products:
July 2026 Scrapbook Kit – Simple Stories simple Vintage Land of the Free 12×12 Collection Kit (papers and stickers)

Other products used:
CARDSTOCK/PAPER: CutCardStock Classic Crest Patriot Blue cardstock, Classic Crest 80# Solar White cardstock
INK: Sakura Clear Star Gelly Roll Pen
ACCESSORIES: Stampin’ Up! Paper Trimmer, My Sweet Petunia Precision Glue Press, Bearly Art Precision Craft Glue, TapeRunner Dots Double-Sided Tape Adhesive, Stampendous Dot Sparklers blue, Scrapbook Adhesives Thin 3D Foam Squares (white mix)

I hope you’ve enjoyed today’s project and you’re thinking about all the fun you could have with this month’s kit… you really ought to think about joining the Subscription Club! Be sure to Follow us on Facebook, Instagram, Pinterest and YouTube for lots of crafty inspiration! And if you do decide to join the Subscription Club, join our ScrapbookingStore Club Member Group on Facebook for more inspiration and to share your projects! Thanks so much for stopping by today – we’ll see you next time!

Scrappy hugs,

A Day At The Beach

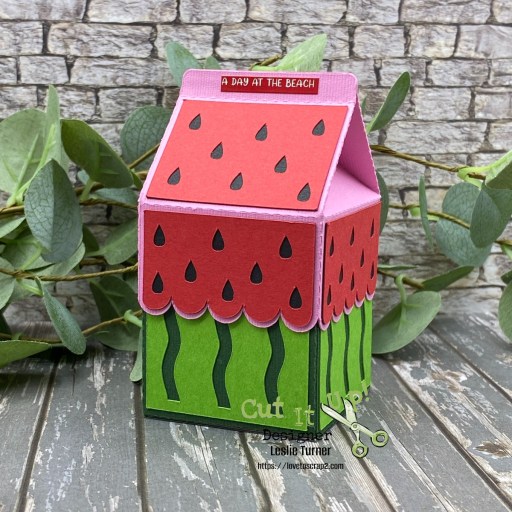
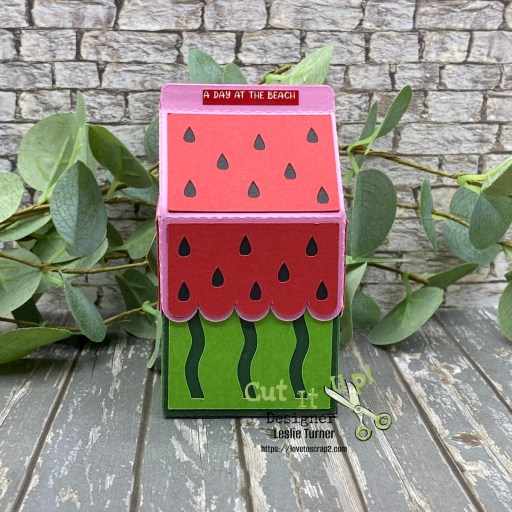
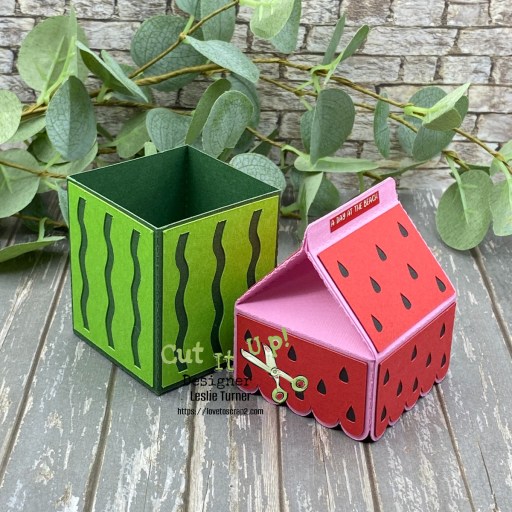
Hi friends, happy Friday! I hope you’ve had a great week and you’re ready to have some fun this weekend! Our new challenge is live this morning over at Cut It Up Challenges and I’m delighted to share my DT inspiration project for #360 – Make Your Own Background. I used the Cyndy G SVG Watermelon Milk Carton SVG cut file, and of course the background looks like a watermelon! It’s a box that can hold all sorts of things from treats to jewelry to money or a gift card! And who doesn’t love eating watermelon at a party… especially a beach party?! This has to be one of the easiest challenge themes of all time because there are so many ways to make your own background. I hope you can join in the fun with us!

Using my Cricut Explore Air 2 and the Cyndy G SVG Watermelon Milk Carton SVG cut file, I cut all the pieces from CutCardStock Kale Green, Granny Smith, Pink Tutu, Pop Tone Black Licorice, and Pop Tone Red Hot cardstock. The assembly was a breeze, and the final step was adding a sentiment sticker from the Carta Bella Beach Party Collection Kit. You can opt to close the top with a clothespin, small paper clip or some other type of closure, but I chose to glue it like a real milk carton.

And here’s one final shot of the lid off the box. How stinkin’ cute is this?!

Sharing in the following challenges:
1. https://avenue613.blogspot.com/2026/07/july-2026-anything-goes-w-optional.html
2. https://alphabetchallengeblog.blogspot.com/2026/07/f-is-for-festivities-eg-wedding-birthay.html (beach party)
3. https://lovetoscrapchallengeblog.blogspot.com/2026/07/ltscb-180-anything-goes-ltscb-179.html
4. https://cinspirations.blogspot.com/2026/07/july-challenge-summer-sunshine.html
5. https://wordartwednesday.blogspot.com/2026/07/anything-goes-weeks-760-761.html

Affiliate links are used in this post at no cost to you – I really appreciate your support! 

Products used:
CARDSTOCK/PAPER: CutCardStock Kale Green, Granny Smith, Pink Tutu, Pop Tone Black Licorice, and Pop Tone Red Hot cardstock; Carta Bella Beach Party Collection Kit (sentiment sticker)
DIES/PUNCHES: Cyndy G SVG Watermelon Milk Carton SVG cut file
ACCESSORIES: Cricut Explore Air 2, Bearly Art Precision Craft Glue

I hope you’ve enjoyed seeing this watermelon milk carton project and will link up with us this time! We’d love to see you project using either wafer dies or an electronic cutting machine! Thanks so much for stopping by today – we’ll see you next time! ;)

Scrappy hugs,